


In our previous blog post, we added experiment tracking to our ZenML pipeline, and discussed how pipelines help us to iterate quickly as we improve model performance.
In this blog we’re going to add model serving to the pipeline. As a reminder, we’ve set out to train a model that recognises short spoken commands, like turn the lights off or play some music. To bring this model to life, we need some way for a human to interact with it in real-time. Serving is the piece of the MLOps puzzle that does this.
If you want to follow along with the code for this series, check out the Github repo.
This is the final instalment of a three-part series:
- Getting started: set up an initial pipeline that trains a minimum viable model.
- Experiments: we add experiment tracking to our pipeline and iterate on our model to improve its accuracy.
- Model serving: The subject of today’s post. We’ll deploy the model as a server so it can receive audio in real-time.
Bringing a model to life
So far, we have a model that’s been trained to recognise a fixed set of spoken phrases. That means when we can provide the model with some audio, it will come back with an inference, in other words it will make a prediction as to which phrase it can ‘hear’.
But the model isn’t especially useful on its own. It becomes useful once an end user can interact with it in some way. In our case, we ultimately want to build a smart assistant; a device that the user controls with their voice. While there’s a lot of engineering that goes into a real smart assistant, we’re going to skip much of that; instead we’ll focus on the model as much as possible.
Serving a model is what brings it to life. It gives us two things:
The ability to interact with the model via an API: this way, if we write any code that needs to use the model, we can do so without knowing internal details like which ML framework the model is trained with.
For our digital assistant, we can imagine having a program that continuously listens for audio from a microphone. That listening program then sends the captured audio, in 5-second chunks, to the model using an API.
The ability to deploy the model where it’s needed: the model could run in the cloud, or on some custom-built hardware. Ultimately, for our digital assistant we’ll want the latter, but we’re not going to worry about that for this blog.
The important factor is this: whatever we end up using to serve the model needs to be flexible enough that we can deploy to any number of different environments. While we’re testing, we want to serve the model locally; later on, we might serve it from the cloud, or from custom hardware.
Microservice architecture and models
It may not be the most exciting thing in the world, but when we talk about serving models we need to think about software architecture too.
Models don’t exist in isolation. They usually form part of a larger piece of software. In our digital assistant, there will be components dedicated to all sorts of things. Think of all the things a real digital assistant can do, like play music, answer questions, control lights.
This all naturally lends itself to a microservice architecture. In case you’re not sure what that is, it’s a popular way to design complex software by breaking it down into a collection of small, simple services, each with their own individual responsibilities.
With model serving, each model is just another microservice. Even though training models is a complicated process involving lots of data science, the final product should look exactly like any microservice. If a developer wants to talk to your model, they don’t need to know about TensorFlow, or hyperparameters, or neural networks… etc.
Serving turns complex models into simple APIs. Now, let’s serve!
Serving with ZenML
Our pipeline so far is straightforward: acquire and prepare data, train, validate.

In this series we’ve made a big deal about ZenML’s 3rd-party integrations. For instance, we can run this entire pipeline anywhere we like; on your own machine, on Kubeflow, Airflow, etc.
When we added experiment tracking, we used the 3rd-party integration MLFLow, which is a sophisticated MLOps tool in itself. Today we’re going to use MLFlow again, this time to serve the model.
You may wonder whether our pipeline needs to be coupled with model serving at all. There’s certainly nothing to prevent you separating serving from your pipeline. However, linking the two together has some benefits:
- After training, control whether the model gets deployed based on performance.
- The pipeline already saves and tracks the model assets, and passes those through the to serving framework. Doing this by hand risks accidentally deploying the wrong version of something.
- It gives you better model provenance, because every deployed model is tied directly to a pipeline run.
- Continuous deployment: build, test, and deploy models automatically and consistently.
Serving step-by-step
First we install MLFlow using ZenML’s integrations command:<pre><code>zenml integration install mlflow
</code></pre>
Next, we’re going to modify the pipeline so that it starts a model server at the end. The pipeline will now look like this:
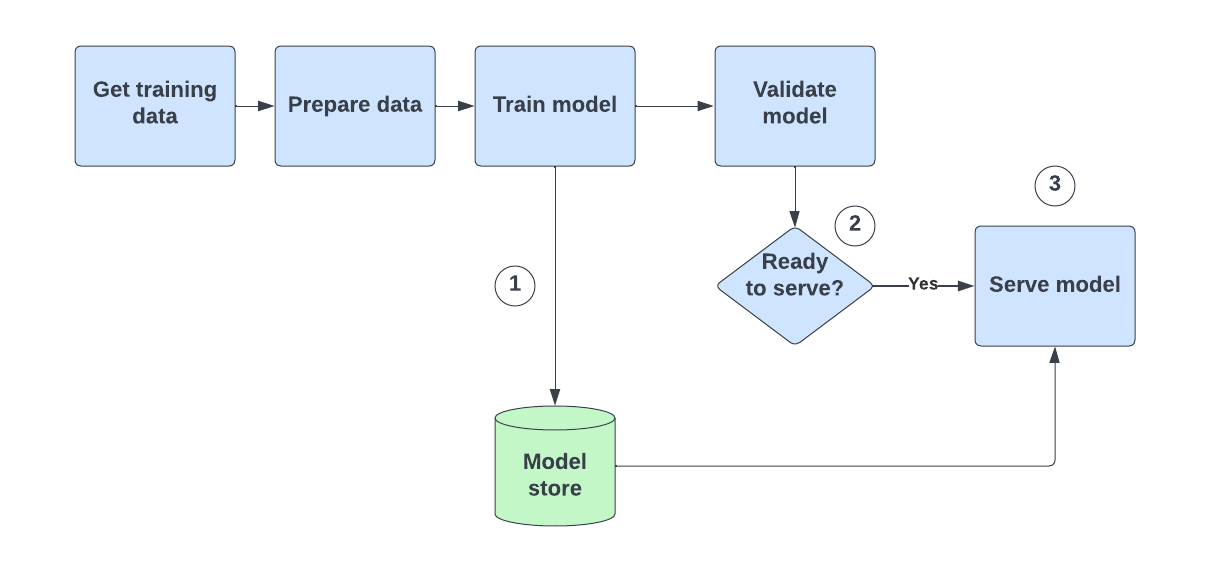
There are three things going on here. Let’s look at each one in turn.
First, in the training step, every model is saved by ZenML. This isn’t new — the pipeline did this from day one — but up until now, we haven’t been using the saved model to do anything.
Secondly, we need a new step that decides whether to deploy and serve the model. We only trigger deployment if the accuracy is high enough:<pre><code>class DeploymentTriggerConfig:
min_accuracy: float
@step
def deployment_trigger(accuracy: float, config: DeploymentTriggerConfig) -> bool:
return accuracy > config.min_accuracy
</pre></code>
For the third and final point, we need a step which deploys the model. But we don’t actually need to write that step, because ZenML provides a pre-built step for doing this:<pre><code>from zenml.integrations.mlflow.steps import mlflow_deployer_step
model_deployer = mlflow_deployer_step(name="model_deployer")
</pre></code>
We add each of these steps (deployment_trigger and model_deployer) to the end of our pipeline. This pipeline is unchanged from before, until the final two lines:<pre><code>@pipeline
def train_and_deploy_pipeline(
get_words,
spectrogram_producer
lstm_trainer,
keras_evaluator
deployment_trigger,
model_deployer
):
x_train, y_train, x_test, y_test = importer()
x_trained_normed, x_test_normed = normalizer(x_train=x_train, x_test=x_test)
model = trainer(x_train=x_trained_normed, y_train=y_train)
accuracy = evaluator(x_test=x_test_normed, y_test=y_test, model=model)
deployment_decision = deployment_trigger(accuracy=accuracy)
model_deployment_service = model_deployer(deployment_decision)
</code></pre>
Querying the model
Our pipeline takes care of saving the model assets, and deciding whether to serve (depending on model accuracy). ZenML takes care of providing the model assets to MLFlow, and launching the MLFlow server.
So all that’s left is to query this model. We can use Curl to make a POST request to the service, and we provide it with a JSON payload that looks like this: <pre><code>{
"instances": [[ some audio ], …]
}
</code></pre>
MLFlow model servers expect to receive a list of ‘instances’. An instance is simply an input for the model; in our case, that input is some audio taking the form of a list of bytes. The server will reply with a list of inferences, one corresponding to each of the instances.
What about other serving frameworks?
One important note is that, at the time of writing, MLFlow is the only serving option in ZenML. However, support for both Seldon Core and KServe is actively under development. So we’ll be revisiting the topic of ZenML serving in the future, once support for these frameworks is released, so watch this space!
Conclusions
Through this blog series we’ve explored ZenML pipelines in the context of a real-world use case. We’ve seen how to use ZenML’s Python library to build a simple training pipeline, and how that pipeline can be gradually extended as a machine learning project grows in sophistication.
The big selling point of ZenML is the write once, run anywhere philosophy. How a pipeline is defined, and how it is executed, are two different things. ZenML uses stacks to help you configure what infrastructure you’re running the pipeline on, and it supports a wide range of 3rd-party integrations, giving you many options in where a pipeline runs, how experiments are tracked, how models are served, etc.
ZenML is also a relatively new project, with big ambitions in terms of features and integrations for the future. Anticipating this, we’ll be revisiting ZenML plenty more in the future!
%20(1).jpg)

.png)


Sign up to our newsletter

Heron House
1 Lincoln Square, Manchester
England, M2 5LN
0161 533 0337